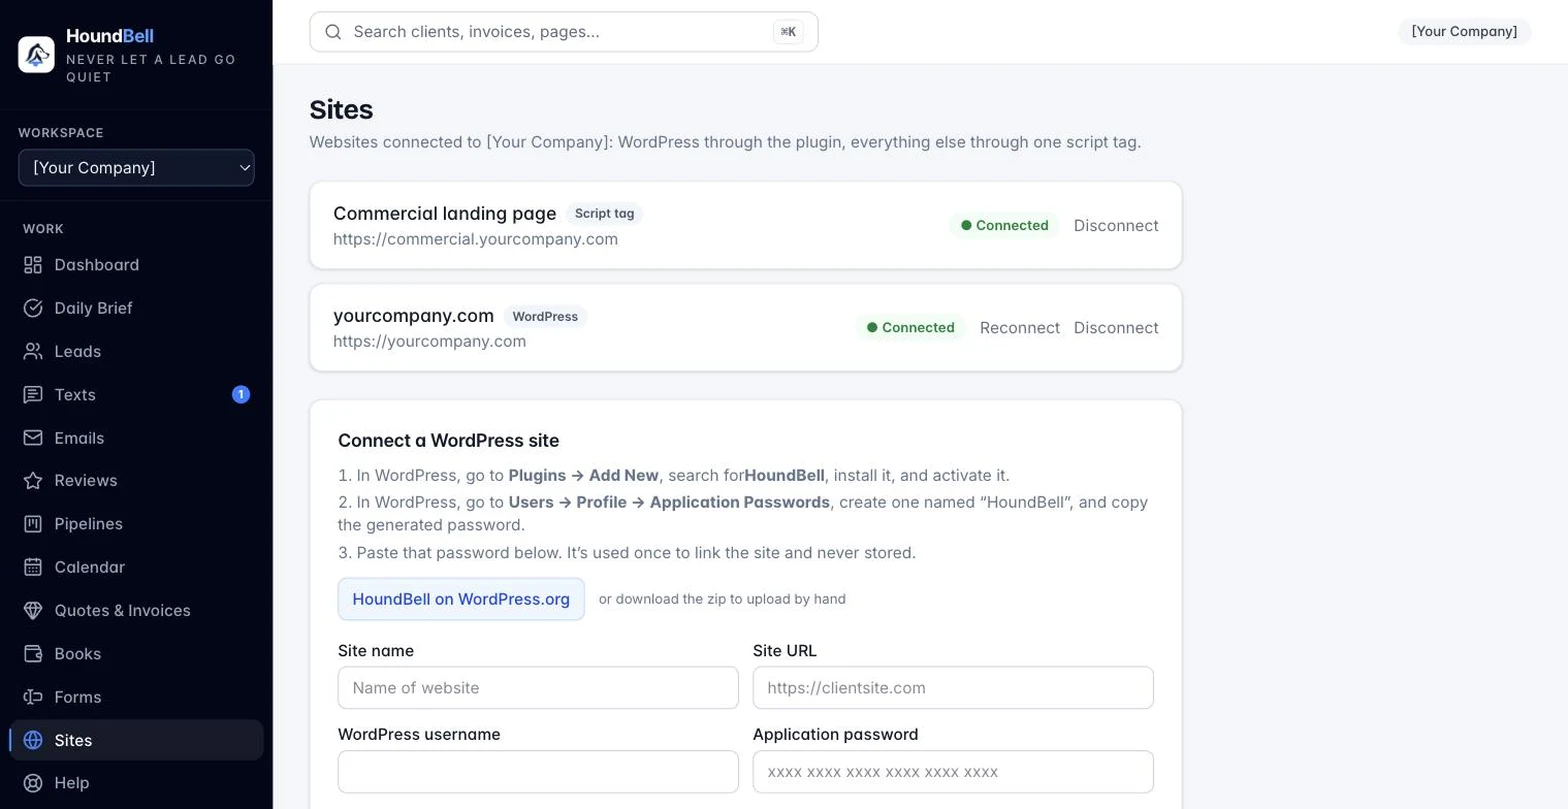
Connect your WordPress site
Connecting your website is a one-time setup that takes about five minutes, and it’s what turns your WordPress site into a lead machine: after this, every form submission lands in HoundBell instantly. You don’t need a developer. You need your WordPress admin login and this guide.
Part 1: Download the plugin
- In HoundBell, open Sites in the sidebar.
- Click Download the HoundBell plugin (.zip). The file saves to your Downloads folder. Leave this page open; you’ll come back to it in Part 4.

Part 2: Install the plugin on your WordPress site
- Log in to your WordPress admin (usually yoursite.com/wp-admin).
- In the left menu, go to Plugins, then Add Plugin. You’ll land on the Add Plugins page.

- Click Upload Plugin at the top of the page. An upload box appears.

- Click Choose File, pick the houndbell-connect.zip you downloaded in Part 1, and click Install Now.
- When the install finishes, click Activate Plugin.
That’s the plugin installed. It sits quietly until you connect it; nothing on your website changes yet.
Part 3: Create the connection password
HoundBell links to your site using a WordPress application password. This is a built-in WordPress security feature: a special-purpose password that lets one outside app talk to your site, without ever sharing your real login. As WordPress itself puts it, application passwords “cannot be used for traditional logins to your website,” and you can revoke one anytime without touching your real password.
- In your WordPress admin, go to Users, then Profile, and scroll down to the Application Passwords section.
- In the New Application Password Name field, type HoundBell (the name is just a label so you remember what it’s for).

- Click Add Application Password.
- WordPress shows your new password in a green box: “Your new password for HoundBell is:” followed by six groups of characters. Click Copy.

Heads up: WordPress warns “You will not be able to retrieve it,” and that’s true, but don’t stress. If you lose it before finishing Part 4, just revoke it and create a new one. Takes ten seconds.
Part 4: Connect in HoundBell
- Go back to the HoundBell Sites page from Part 1 and fill in the connect card:
- Site name: what you want to call this site, for example your business name.
- Site URL: your website’s address, for example https://yourbusiness.com.
- WordPress username: the username you log in to WordPress with.
- Application password: paste the password you copied.
- Click Connect site.
Your site appears at the top of the page with a green Connected badge. The application password did its one job (proving to your site that HoundBell is allowed in) and is never stored; from here on, the plugin and HoundBell talk over their own secure signed connection.
Part 5: Prove it works
- Open Forms, pick a form (or create one from a template), set its WordPress site to your newly connected site, and click Save & publish.
- Copy the form’s shortcode from the builder and paste it into any WordPress page.
- Visit that page and submit a test with your own email.
Within seconds: the lead appears on your Leads page, your phone buzzes if you’ve turned on notifications, and the new-lead email lands in your inbox. That’s the machine running.
If something goes wrong
- “Install Now” fails or the upload is rejected: your hosting may limit upload size or block plugin uploads on certain plans. Your host’s support can lift this in minutes; the zip is small.
- Connect site says it couldn’t reach your site: double-check the Site URL (https, no typos), and confirm the plugin is Activated on the site, not just installed.
- The password didn’t paste right: the spaces in the application password don’t matter, but a missing character does. If in doubt, revoke it in WordPress and create a fresh one.
- You manage multiple sites: repeat this guide per site. Each form chooses which connected site it appears on, and agencies typically use one workspace per client with that client’s site connected inside it.
Still stuck?
Email us and a person will answer. Include your workspace name, and the quote or invoice number if it is about one.
Email support@houndbell.com